Introduction to Page Development
Overview
Documents represent knowledge or contextual guidance and are the basis for all work done through collaboration. A document can consist of just a "wiki page", or serve as a container for automation models for Runbooks or decision trees. The wiki page is the visual content of a document displayed in the browser and differs from "Runbook pages" designed to dynamically deliver Runbook procedures and results. There are four general strategies for document creation using Resolve Actions Pro.
- Within Actions Pro itself, users and developers can manually create documents using either the Source Editor to directly write source code.
- Use the Page Builder to assemble documents out of various components.
- Users can simply copy and paste code into an Actions Pro document from any external HTML editor. In most cases, a hybrid approach combining any of the different strategies will be used. Though HTML-based, mechanisms in Actions Pro make content delivery and maintenance easy.
Documents can have multiple looks and presentations, but the goal in document development is to make content easy to use and maintain. To achieve this goal:
- All documents should follow a set of standards for content and format which is accomplished with templates.
- Some documents may require more customization and are marked appropriately.
- A system of document management is helpful.
- Rarely-used documents containing outdated content should be retired to keep the knowledge ecosystem clean (often referred to as "good housekeeping"). These documents are placed in a separate sub-folder.
- Use a revision system and log to ensure the use of most current documents.
Document Design and Sectioning
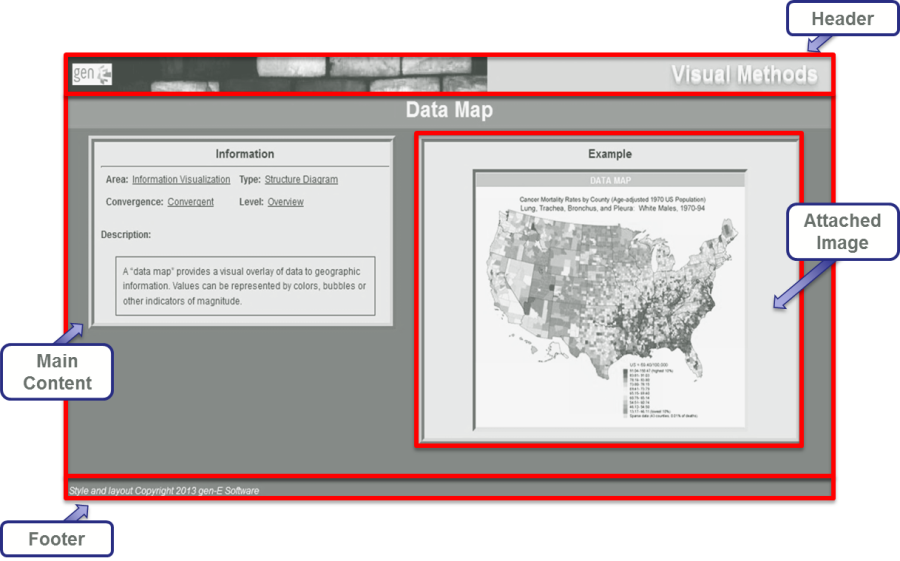
Documents are created in sections, indicated in the source code with {section} tags. The key to good document layout design is sectioning. A document usually has a:
- Header
- Footer
- Main display area
- Different sections can have their own color, font, and design elements.
Each section consists of one or more components. There are different types of components, depending on the function or method. Components, therefore, define the type of content. There can be multiple components of the same type; however, components (and sections) are stacked alongside each other and cannot be embedded (otherwise, code rendering will be impacted and editing errors will occur).Some sections are created and maintained by something other than the Source Editor or Page Builder, namely decision tree sections. Changing the content of a section (as source code) can make the section non-editable by the specified editor. This is especially true if editing decision tree sections, which could break the decision tree.
The following figure shows a typical document layout.
Creating Sections
Each document section can have its own layout design (usually written in CSS) saved separately and loaded into new documents as necessary. Generally, a master library document is kept that contains styled sections to be included in other documents (see Themes). Entire documents or individual document sections can be referenced by and embedded into other documents with the function #includeForm ("namespace.runbook#sectionname").
The section name in the #includeForm command is optional if referencing the entire document.
Sectional groups can be used together consistently to form stylistic themes familiar to users. This method enables standard headers (letterheads), standard footers, and pro forma content (such as copyrights, disclaimers, logos, or page help). Not only does modular composition support enterprise visual standards, but also it minimizes maintenance. Only the library document would need to be updated, which can be managed separately through one-time edits without complicating other documents.
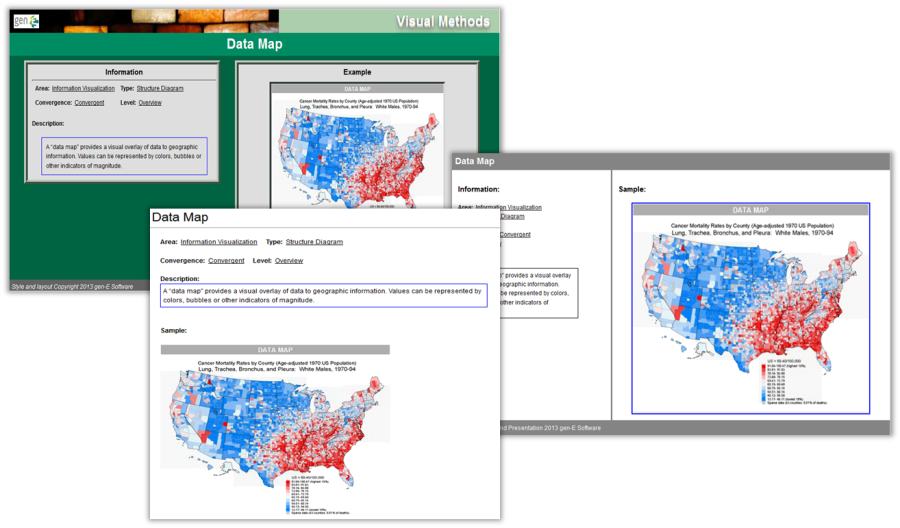
The following figure shows documents with similar content but with different layouts.
Document Themes
Themes are standardized document layouts. Distinctive stylistic themes can be applied to frame content of documents, even Runbooks. The use of standardized design elements produces a consistent look and feel for groups of related documents. Previously mentioned design and improvement techniques, such as using sections and CSS style sheets, can be applied as part of a theme.
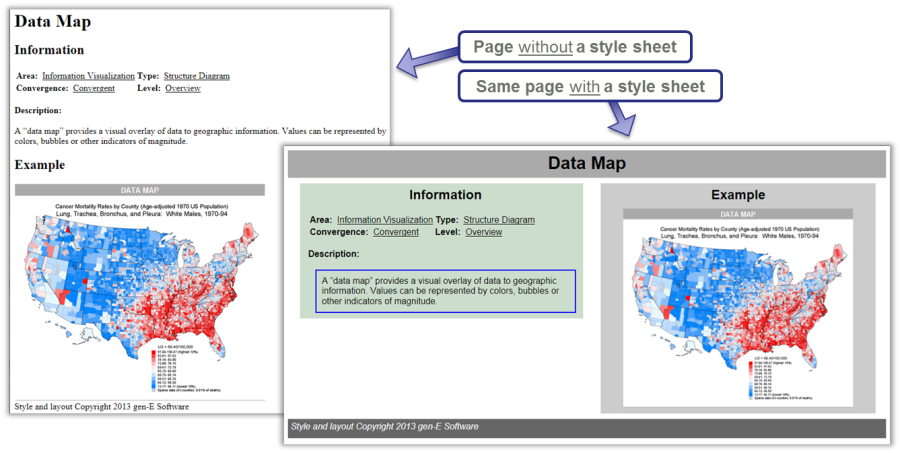
The following figure shows the effects of a style sheet.
Themes should be implemented with only with specific guidelines.
- They can be coded in-line on page, but more conveniently stored in a CSS style sheet for referencing and included by other documents.
- Each theme should be completely contained in a single library-style reference document, with each element of that theme coded as separate sections in the document.
- Images related to the theme should be part of the theme document.
Themes implemented using these guidelines support the portability and clustering in Actions Pro.
- Separating presentation elements from document content (typically written in HTML) in this way improves control and flexibility over the presentation specification.
- It also enables shared formatting across multiple pages, and reduces complexity and repetition in content coding.
- This also allows the same page to be presented in different styles for different screen sizes or devices.
There are alternatives to using CSS;
- use an included Runbook page (portable for export/import)
- use an HTML standard "href" to reference a standard stylesheet. The HREF style sheet must be stored on all UI servers in the same location relative to the Actions Pro application, but in a user directory.
As a general rule:
- Style elements from multiple themes should not be used in the same document.
- Themes (standard design layouts) and templates (standard content creation) complement each other.
Creating a New Document
In Actions Pro, there are three simple ways to create a new document.
Method #1
- Enter a name and namespace for the new page in the main toolbar Search box.
- Click the Go button.

If the document does not yet exist, it will be created. - To save your document and create its first draft version select Save button, navigate to "File" drop-down menu and find the Save option or use the shortcut keys Ctrl+S.
Method #2
- From the main toolbar, navigate to Action Definition menu and select All Automations page.
- In All Automations page click on New button.
This will bring up the "New Runbook" dialog box, which prompts for the new document name and the template to use. - Select the desired Namespace where the document will be located from the drop-down menu or type in a new one. Provide Name for your document.
- Click on Add button.
- Page Builder is loaded. To save your document and create its first draft version select Save button, navigate to "File" drop-down menu and find the Save option or use the shortcut keys Ctrl+S.
Method #3
Optionally, a simple document page specifying only the document name, namespace, and placeholder text for content can be created from within an ActionTask.
To create a document from an ActionTask, use the following code:
def params = new HashMap();
params.put("USERNAME", "admin");
params.put("namespace", "ESB");
params.put("docname", "Create");
params.put("content", "This document was created using ESB");
ESB.sendMessage("RSVIEW", "MWiki.create", params);